
Example SSO setup with Microsoft Azure
This page will help you configure SSO with ecosio products and Microsoft Azure.
Configuring SSO with ecosio and Microsoft Azure
Below describes an example of the steps required for configuring Microsoft Azure as a SAML IDP in the Monitor.
Creating a SAML application in Azure
The first step is creating a new Enterprise application in Azure. On the “Enterprise Applications” page, select New Application.
On the Microsoft Entra Gallery page, you’ll have to select Create your own application.
Give your application a name, and select Integrate with any other application you don't find in the gallery (Non-gallery).
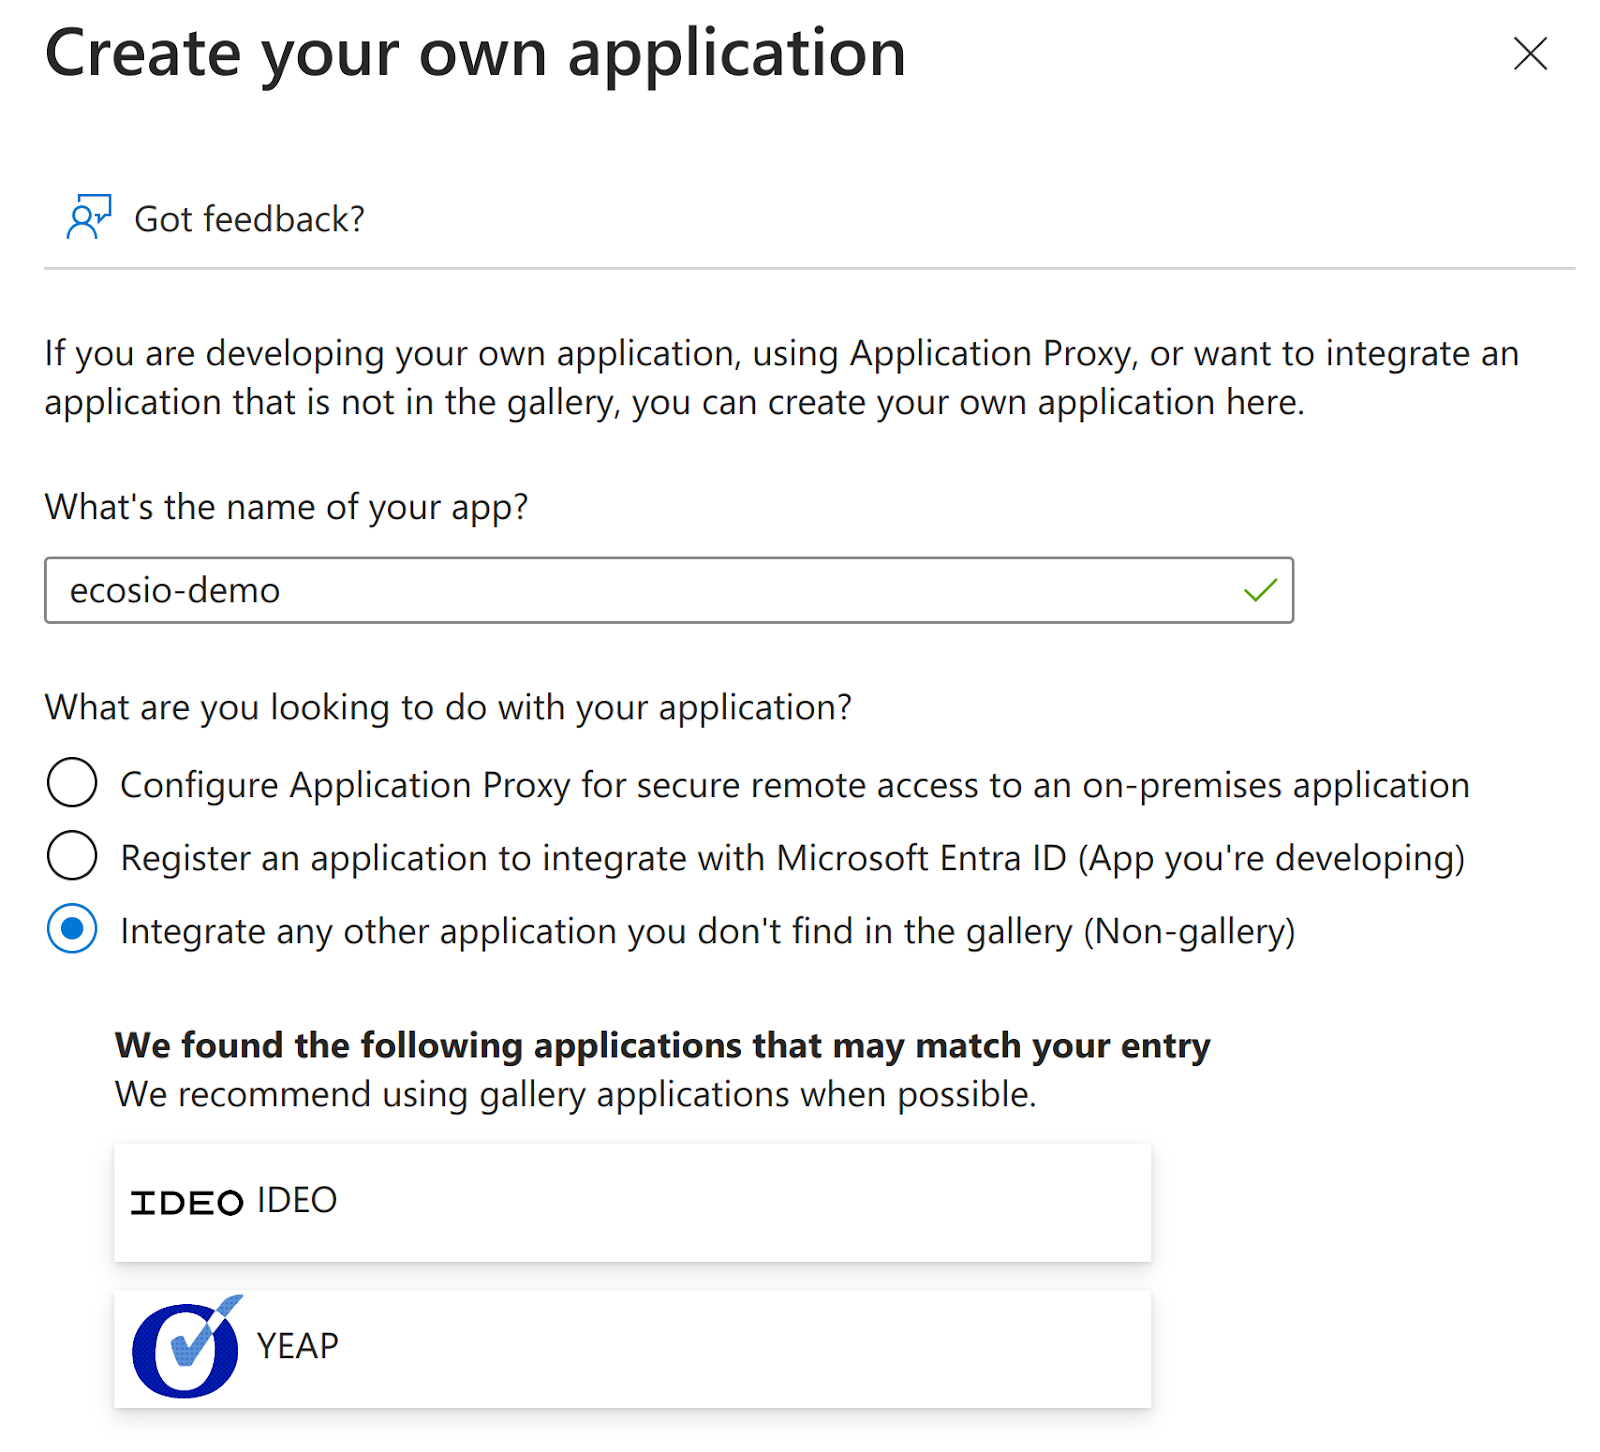
Select Create, and your application should be created (though it might take a few seconds to complete).
Once the app has been created, you should be redirected to the app page.
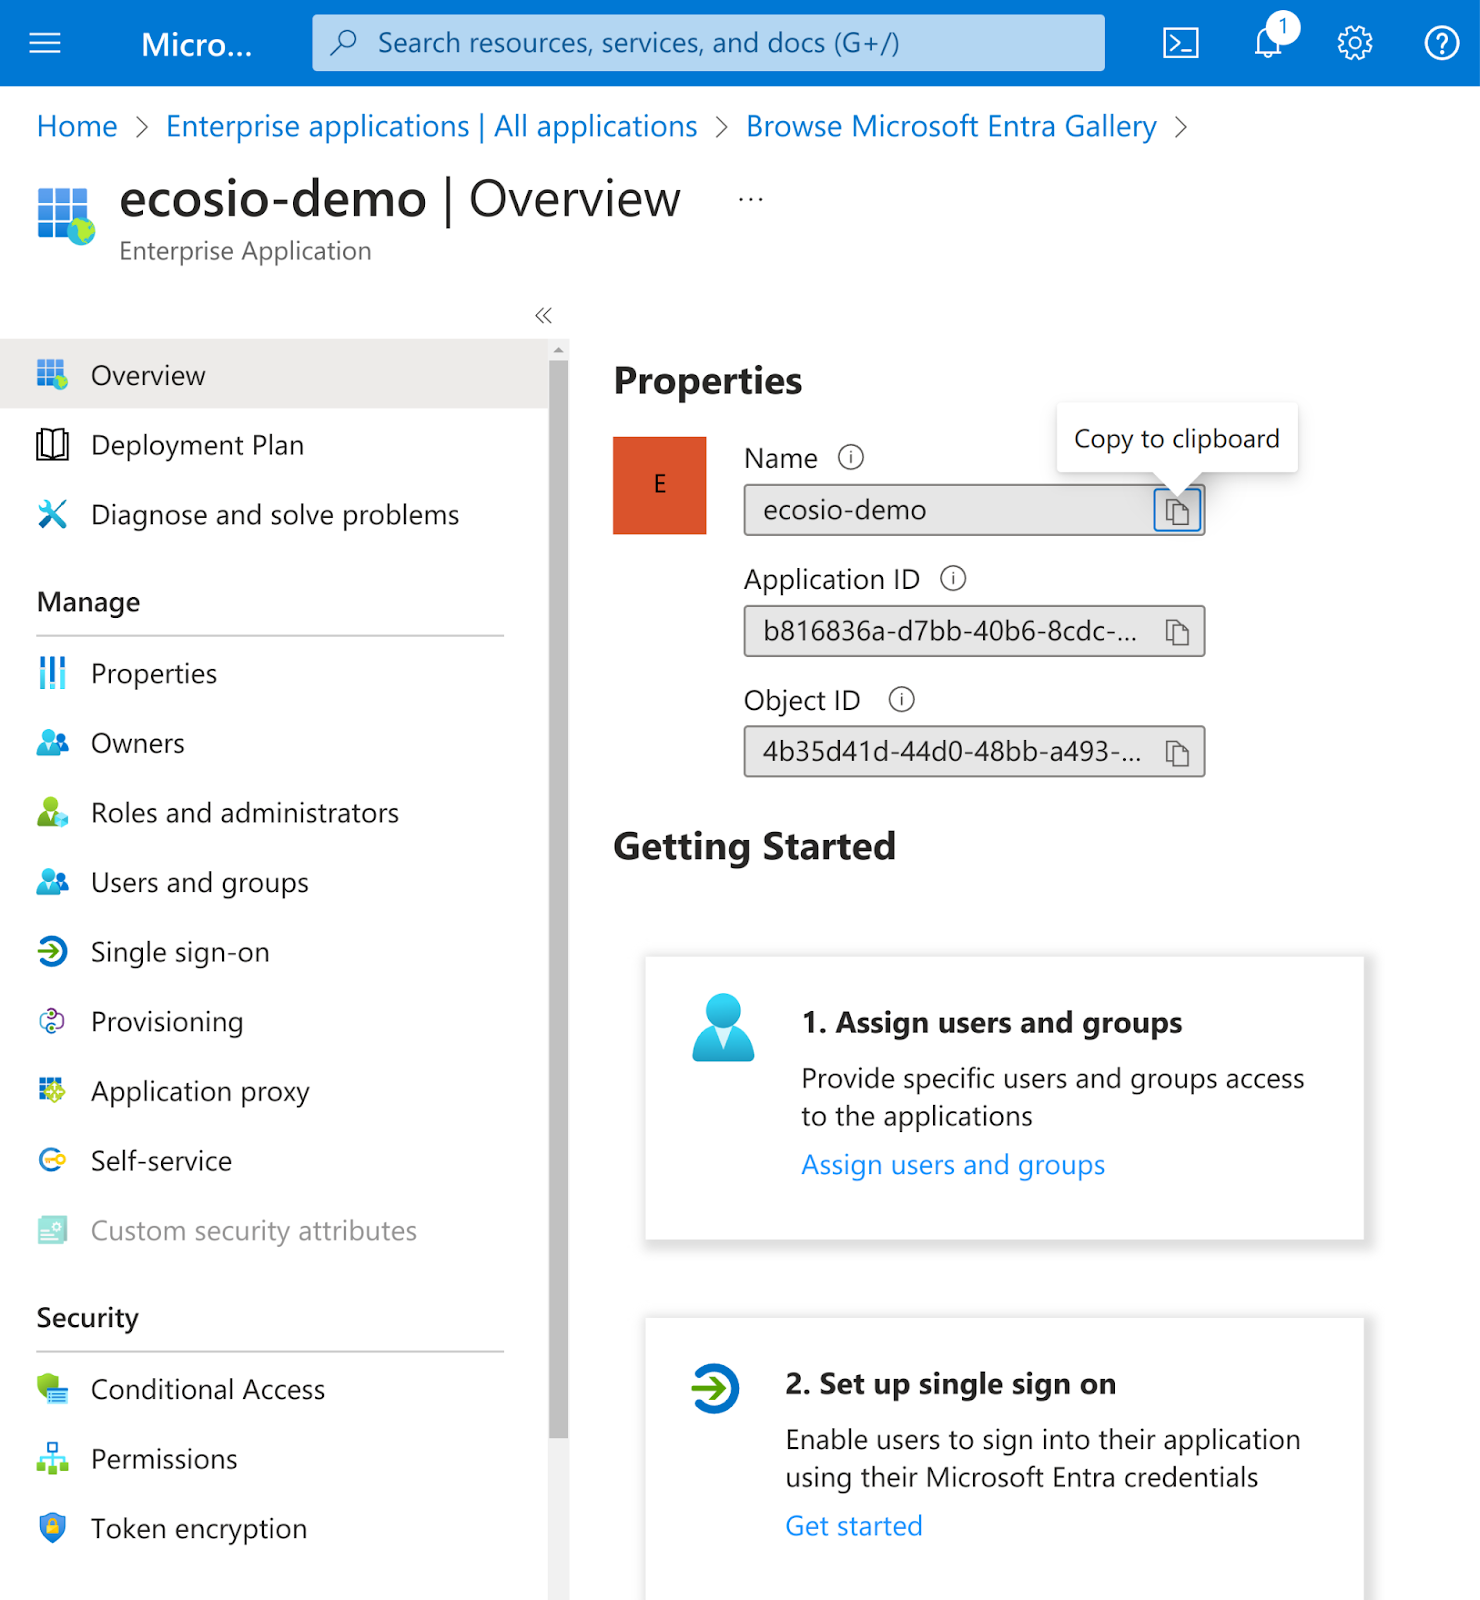
Assign Users to the Application
Before you start with the SAML configuration in the application you have just created, you’ll need to first make sure you assign users that will be allowed to use this application when signing in via SAML.
You can do so from “Users and Groups”.
Setting Up the Basic SAML Configuration
This step and the following requires configuration in both Azure and in Monitor.
Make sure you have the “Create SAML Configuration” page open in monitor (https://app.ecosio.com/account/settings/saml-config/create).
In Azure, head over to “2. Set up single sign on”. Select SAML as a single sign-on method.
You should now be on the “SAML-based Sign-On” page.
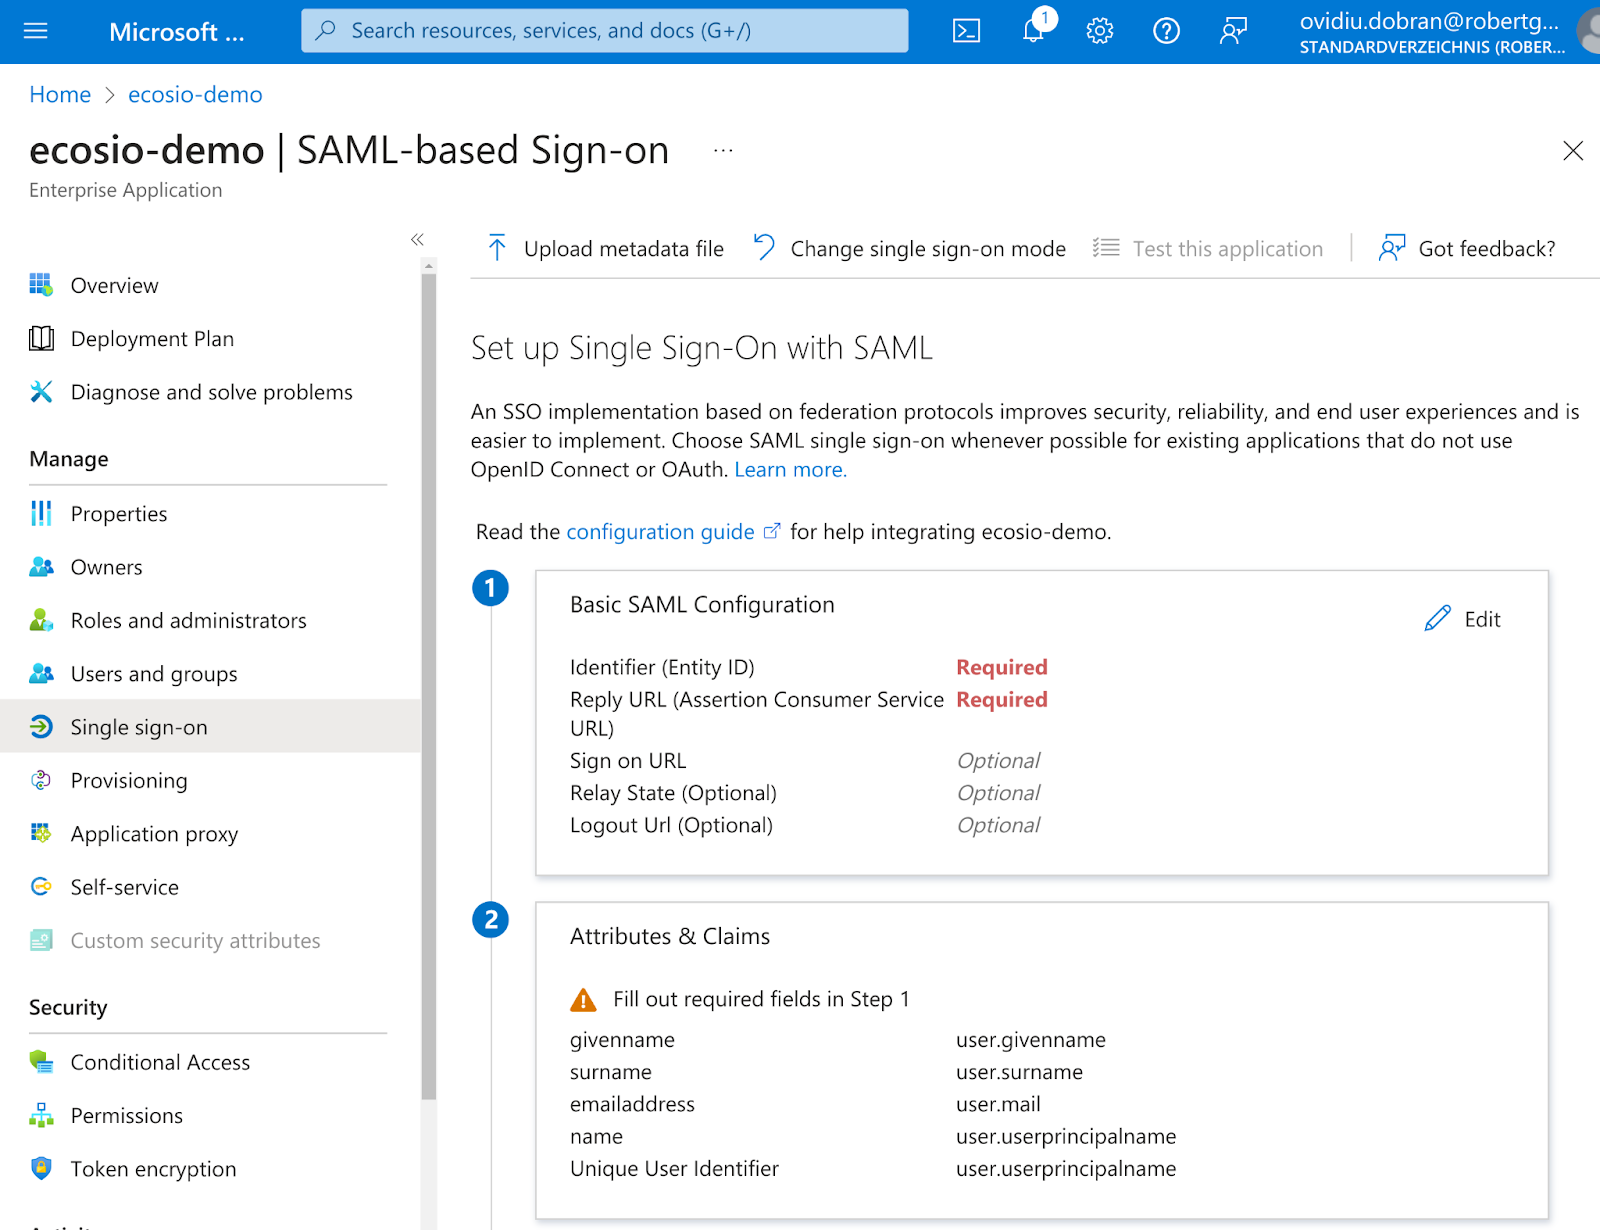
From “Basic SAML Configuration”. select Edit.
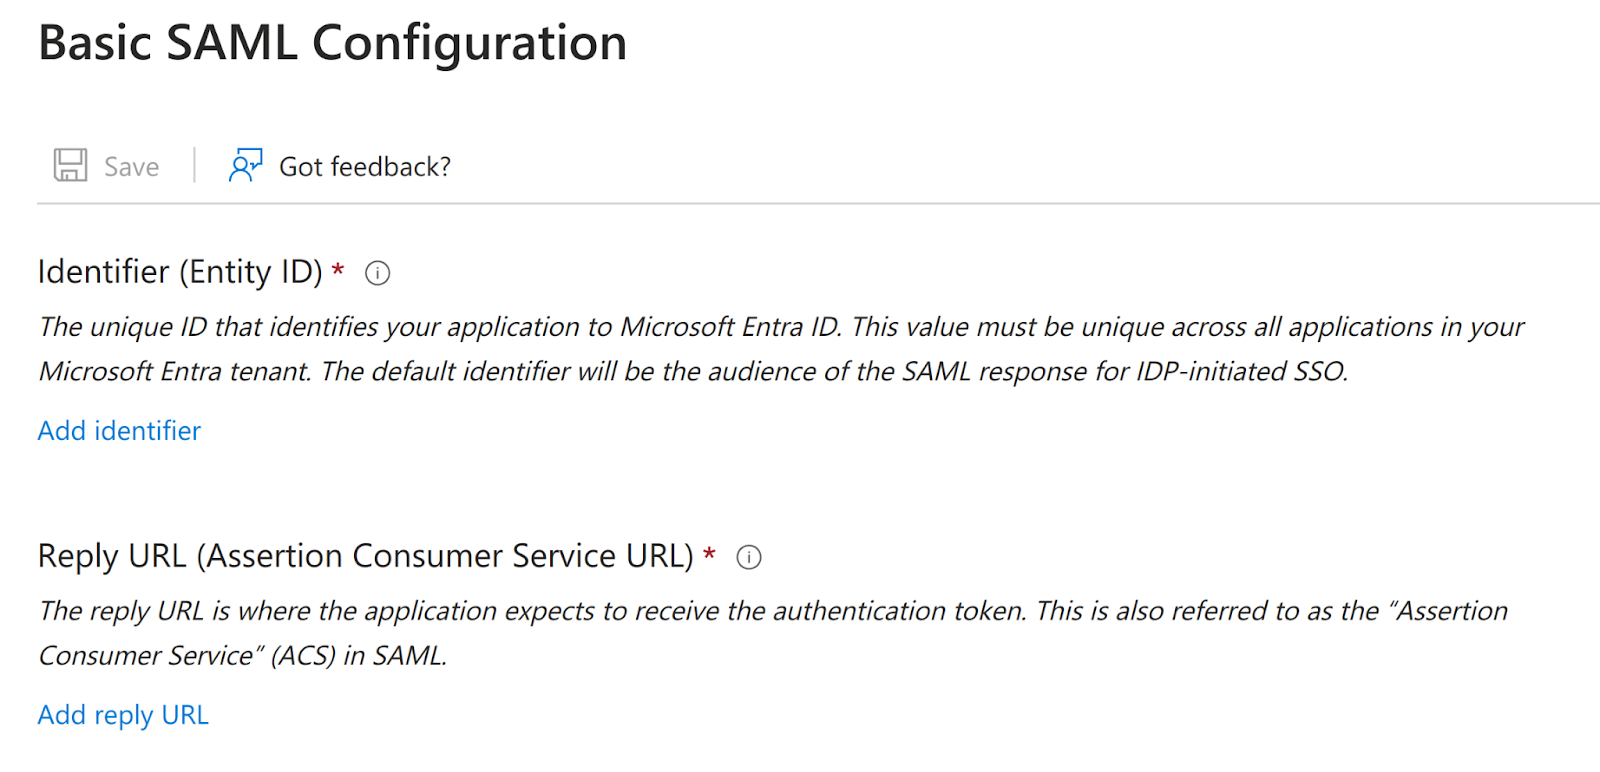
You will only need to add the “Entity ID” and the “Reply URL”. You can find and copy these two fields over from monitor.
WarningDon’t use the data you see in this screenshot. Only copy the values you see in your monitor instance!
Once you’ve copied these values in Azure, you should hit “Save” in order to save your configuration.
External IDP settings
In “External IDP settings”, you need to set-up the following data below.
Provider Name
The value of this field is not from Azure, rather it should be a unique value that you pick.
Domain Identifier
This is where you specify the Email domains of the users allowed to sign-in via SAML.
You can add multiple domain identifiers; just make sure they are unique and no two IDPs share the same domain identifier (you will be warned if that’s the case when you try to save the IDP).
WarningIf you omit a domain identifier (e.g: demo.com), all of your users that share this email domain (e.g: john.doe@demo.com) will not be allowed to sign-in via SAML.
Metadata URL
In order for trust to be established between the ecosio and your Azure IDP, our application will require you to enter a Metadata URL, which you can find in Azure under “SAML Certificates”.
Copy the Metadata URL into monitor in the “External IDP settings”.
Attributes & Claims
The Attributes & Claims section is where you configure the user data exposed to ecosio when users sign-in via SAML. Select Edit.
Unless your organisation has sub-companies, you don’t need to change anything here. For sub-companies, see below in the Sub-company mapping section.
For now, you should be interested in the “Additional claims” table, as shown under the “Required claim” below:
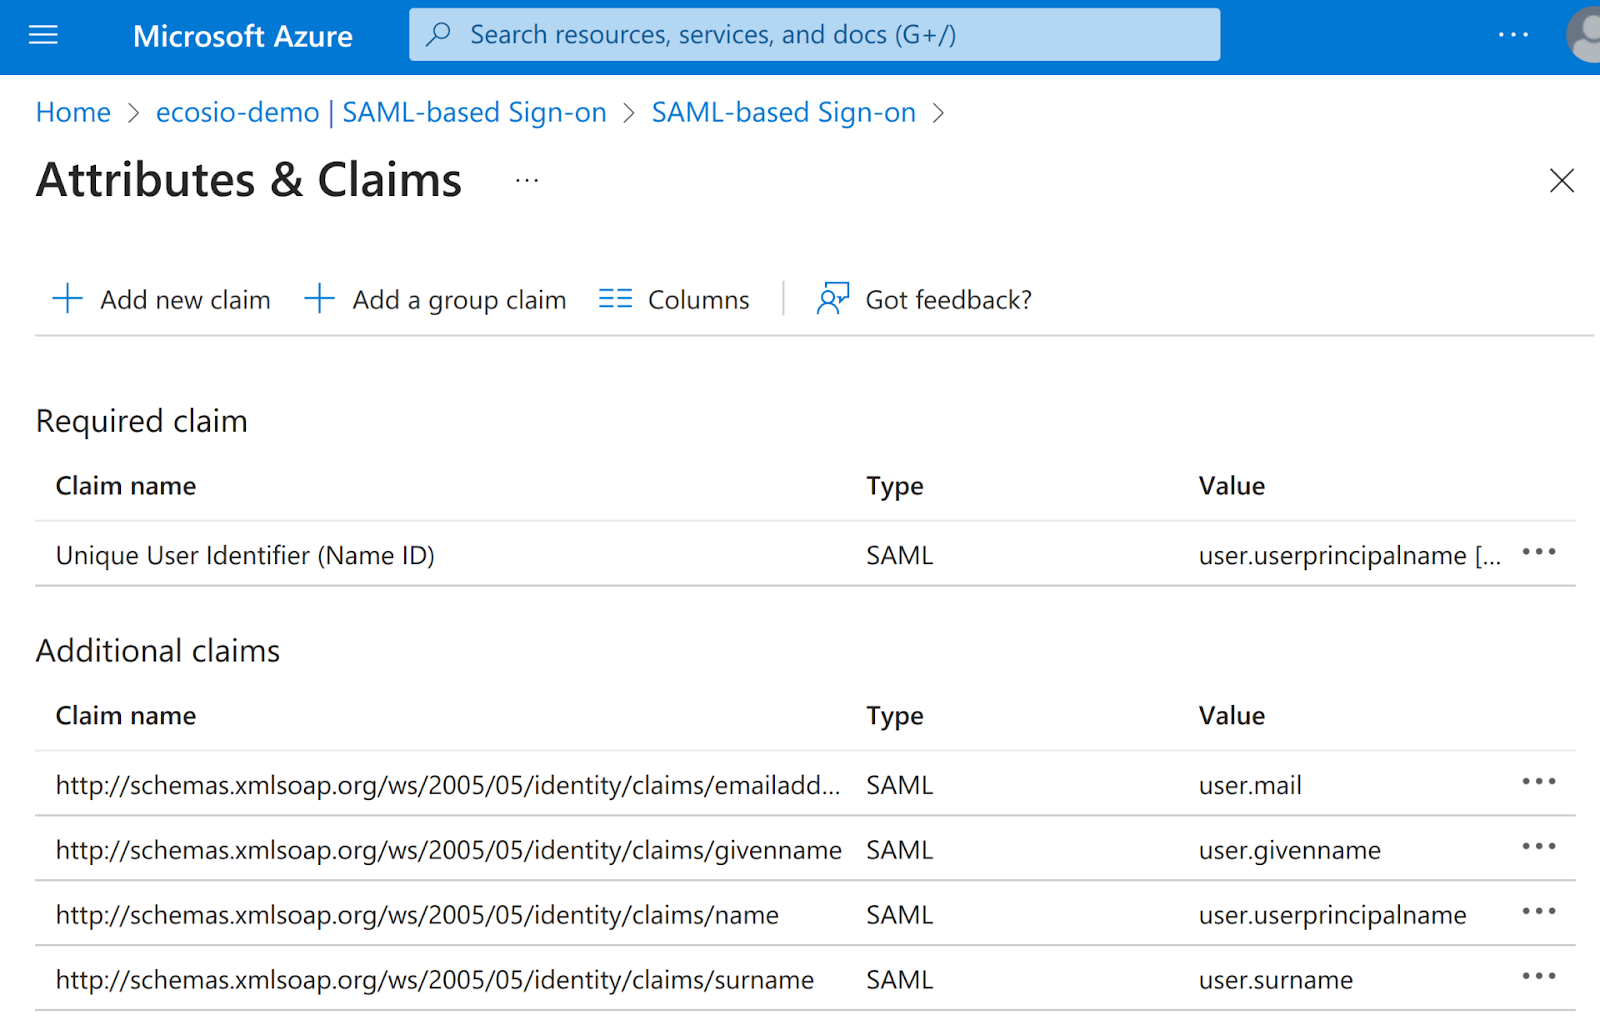
NoteWhat are claim names? They are the “external” fields that ecosio will receive when a user authenticates. In this table you see how these “external” fields - the Claim names - are mapped to the internal fields of your users.
Therefore, when a user authenticates, given the table above, the path on which ecosio receives the email is not user.mail, but the full Claim name, so http://schemas.xmlsoap.org/ws/2005/05/identity/claims/emailaddress.
Azure allows you to change these claim names (although ecosio does not require you to do this). Just select the claim you want to change.
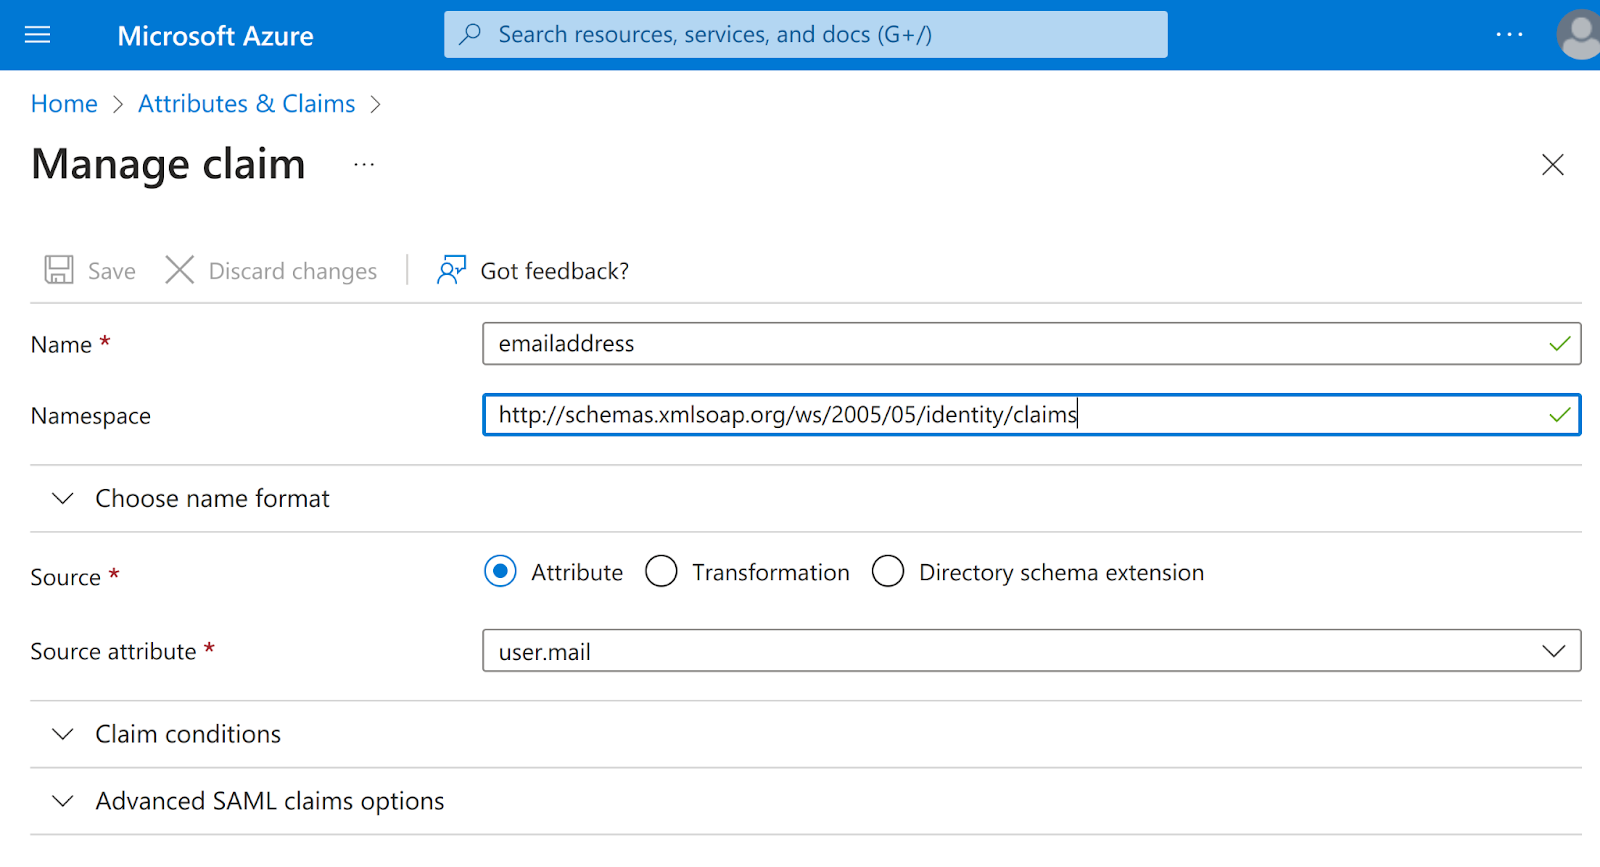
Keep in mind that the final Claim name will be in order of Namespace + Name.
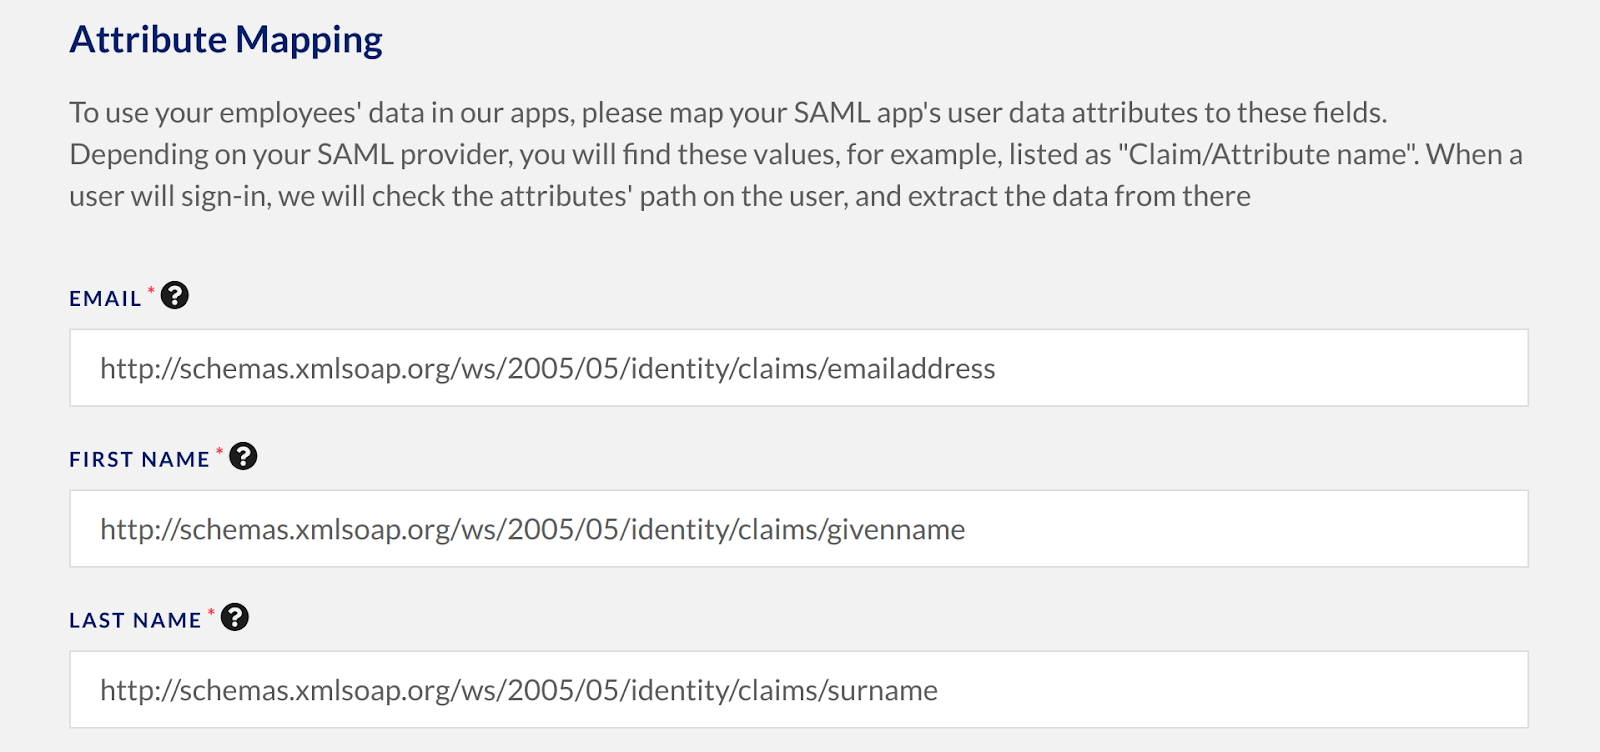
You can now head over to monitor to configure the mapping of the main fields ecosio requires from your IDP: email, first name and last name.
NoteThe values you input here are NOT the internal fields of Azure (e.g user.mail) but the full Claim name, as shown above.
Therefore, (depending on whether you changed your Claim names), the “Attributes Mapping” section in monitor should look something like this:
Sub-company Mapping
If there are multiple companies in your organisation you can create a single SAML IDP configuration in monitor and thus give access to users from all sub-companies.
However, new users who sign-in into monitor for the first time need to be assigned either to the root company or to a sub-company.
There are two ways to configure how new SAML users are mapped to sub-companies: by domain (email) identifier, and by custom attribute.
Mapping by Domain Identifier
In this case a Mapping Row for each domain identifier will be added for each domain identifier.
For example, assume you have the following domain identifiers:

Then, when you enable the sub-companies mapping flag, by default you would see something like this:
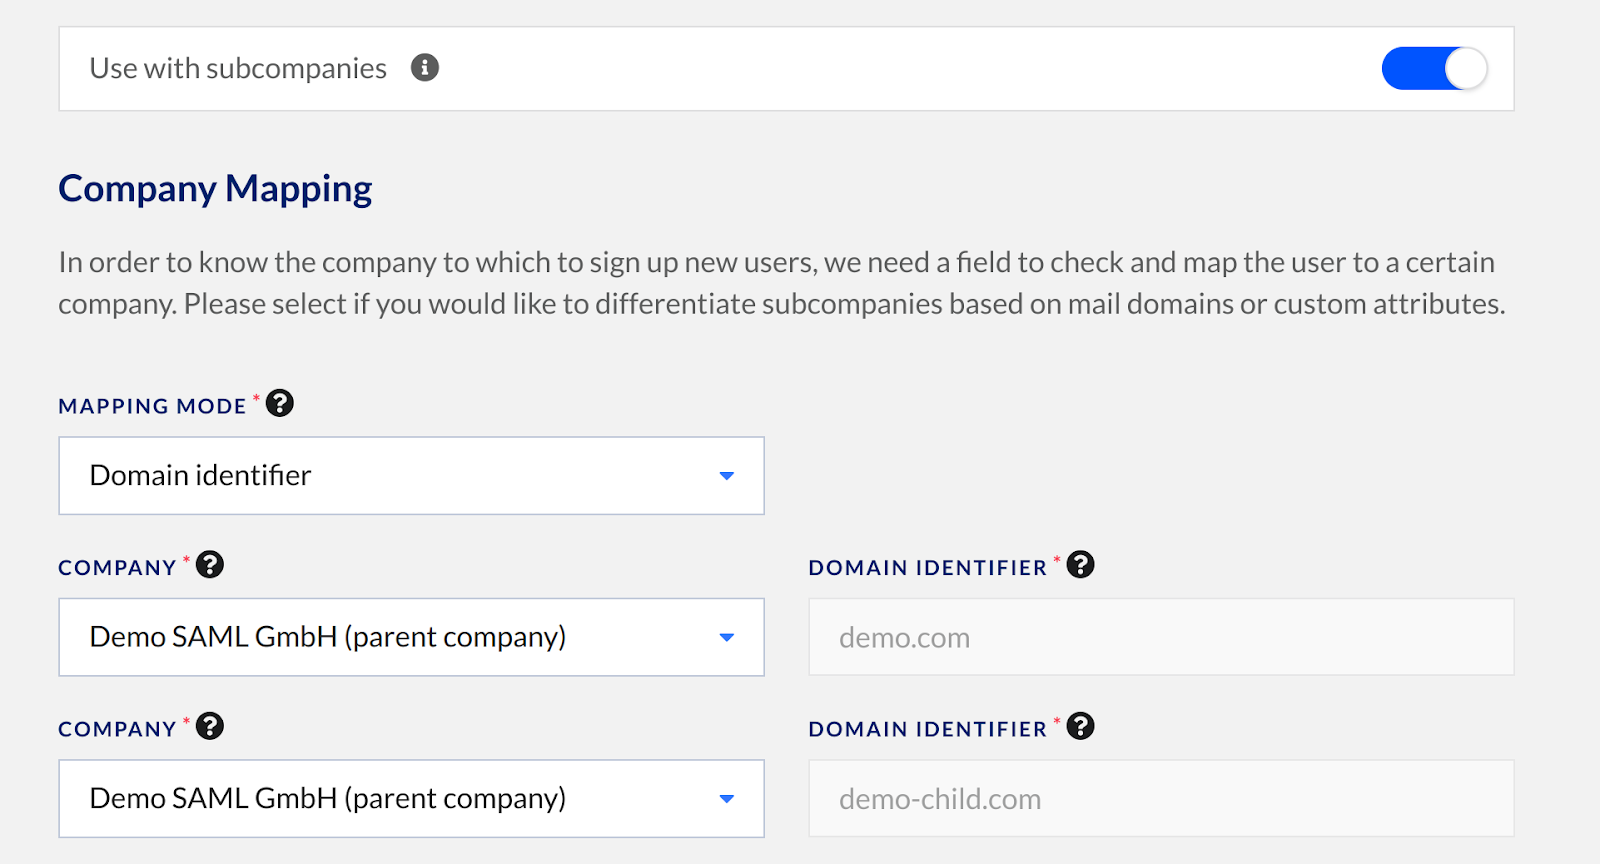
As you can see a company mapping row was automatically added for each entry present in the “Domain Identifiers”. By default all rows are prefilled with the parent company, but of course you can change to a different company/sub-company.
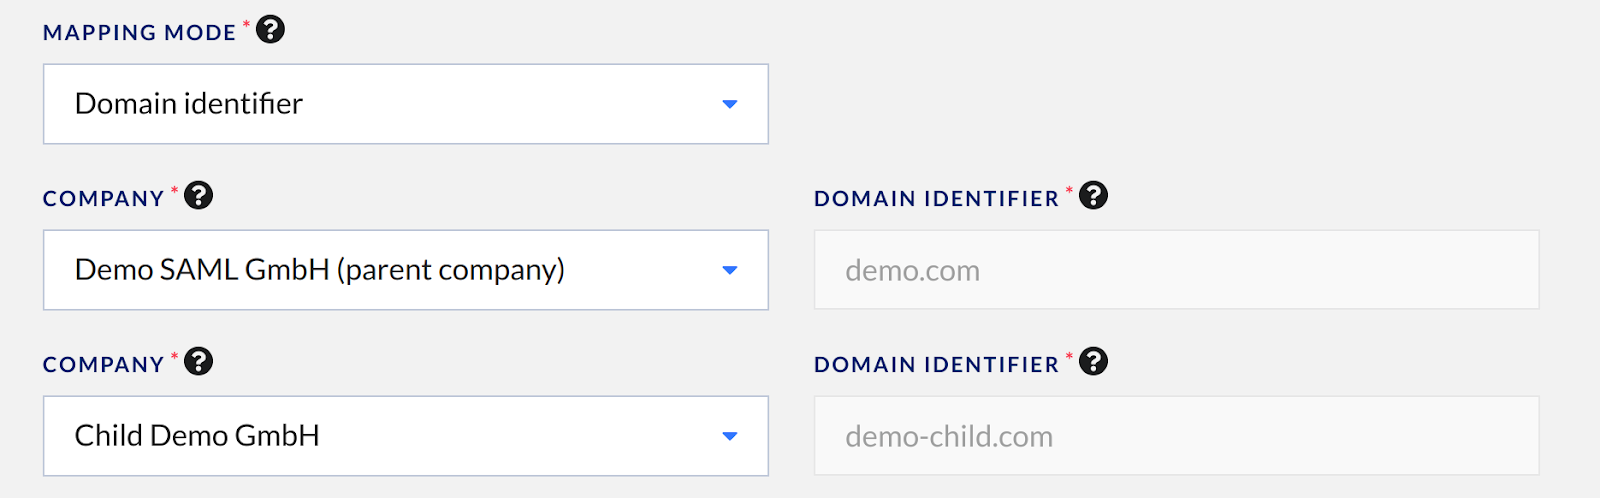
Here’s how the configuration above can be interpreted: users whose email domain equals demo.com will be assigned to the parent company; users whose email domain equals demo-child.com will be assigned to the selected sub-company.
Example:
Assuming there is a user - [email protected] - who hasn’t signed-in into monitor yet. When they choose to sign in via SAML, they will be assigned to the company Demo SAML GmbH.
Mapping by Custom Attribute
Your organisation could have a more complex use case. Let’s assume the users are distributed across different sub-companies not by their email domain, but by a different field.
This could be the case when, for example, all users have the same email domain, even though they are part of different sub-companies.
In this case your organisation could have a dedicated field meant for referencing to different sub-companies.
Let’s assume that the user field in your Azure IDP that identifies the company the user is assigned to is user.companyname. This is just an example; it could be any field available on the users registered in your Azure IDP.
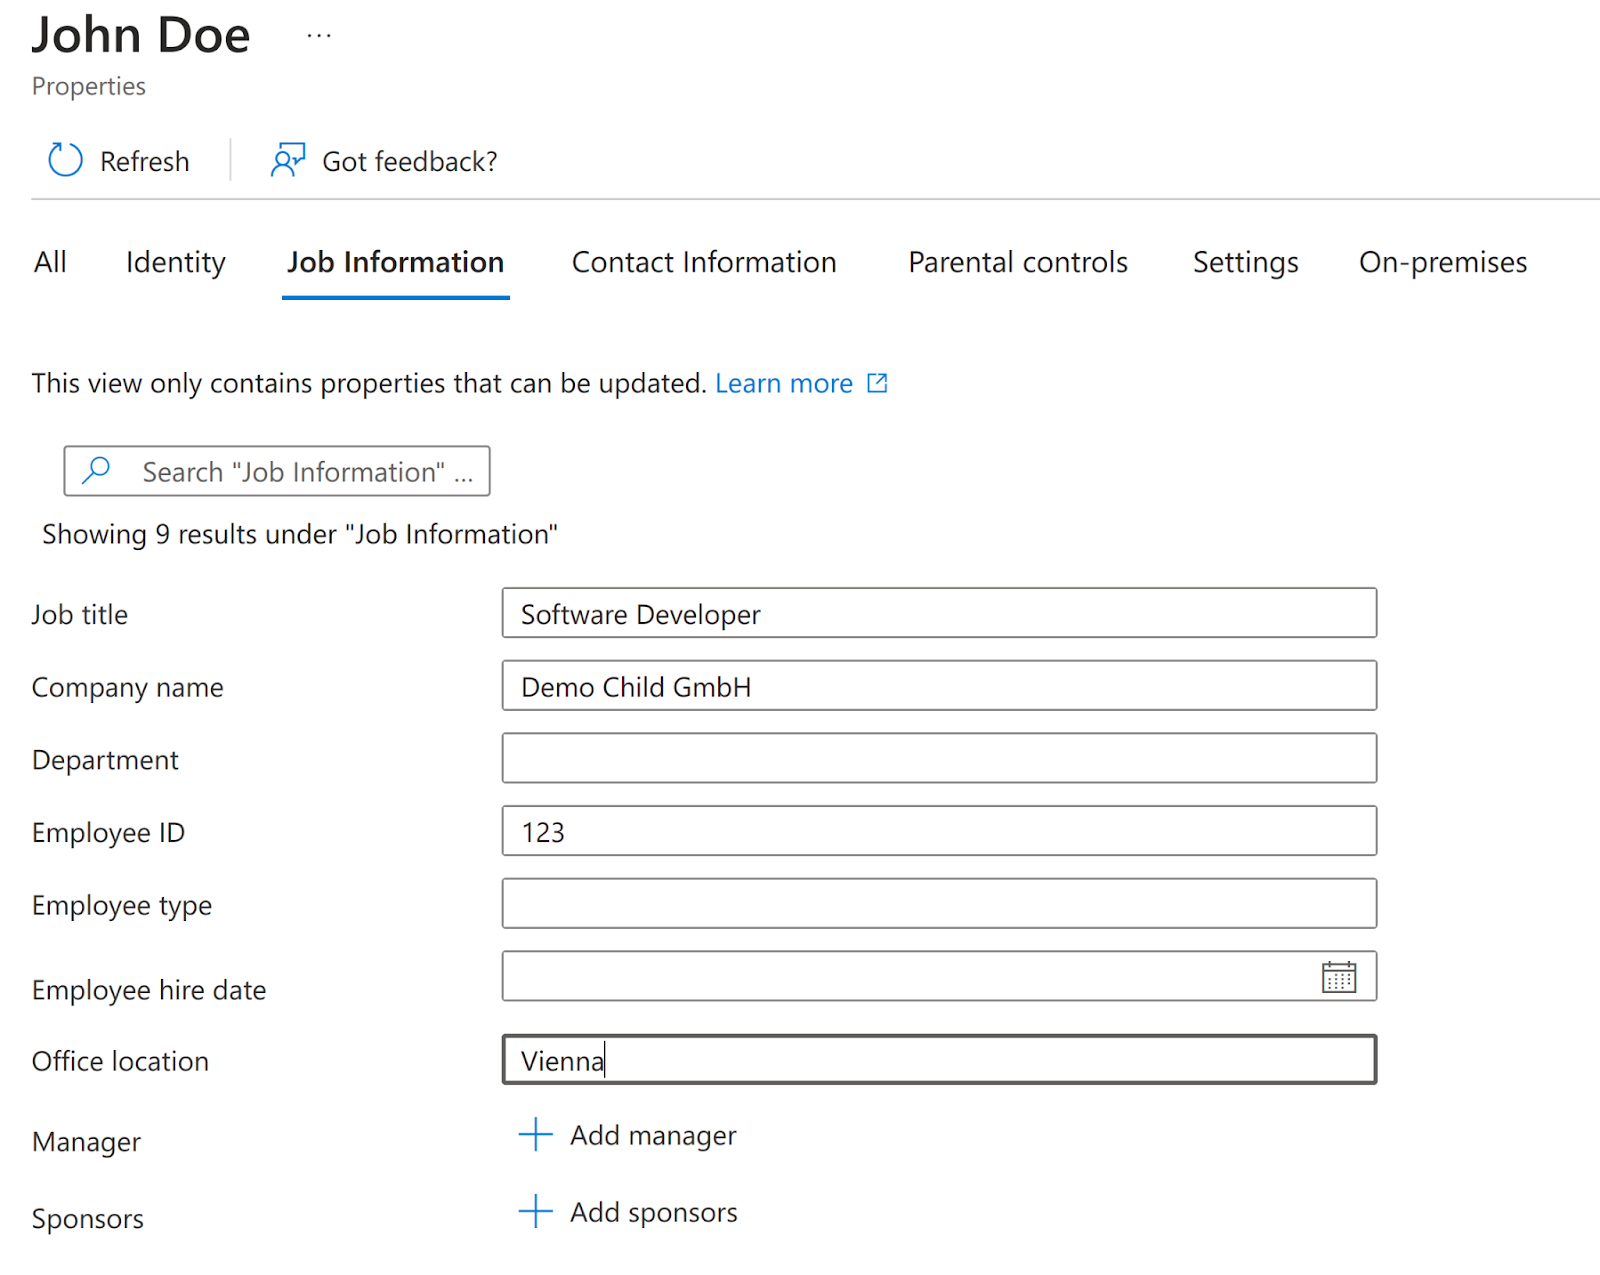
WarningAt this stage, ecosio can’t provide information about which field is used to distinguish the companies users are assigned to. This is up to the data model your organisation agreed upon. Please check this with the administrator of your Azure Workspace.
The next step is making sure that ecosio receives the field identifying the sub-company.
Therefore, a Claim is needed. For this, head back to the Attributes & Claims page.
Here you will have the option to Add a new Claim.
You will have to name this claim (namespace is optional). Also, you need to specify the internal source field whose value will be assigned to this claim.
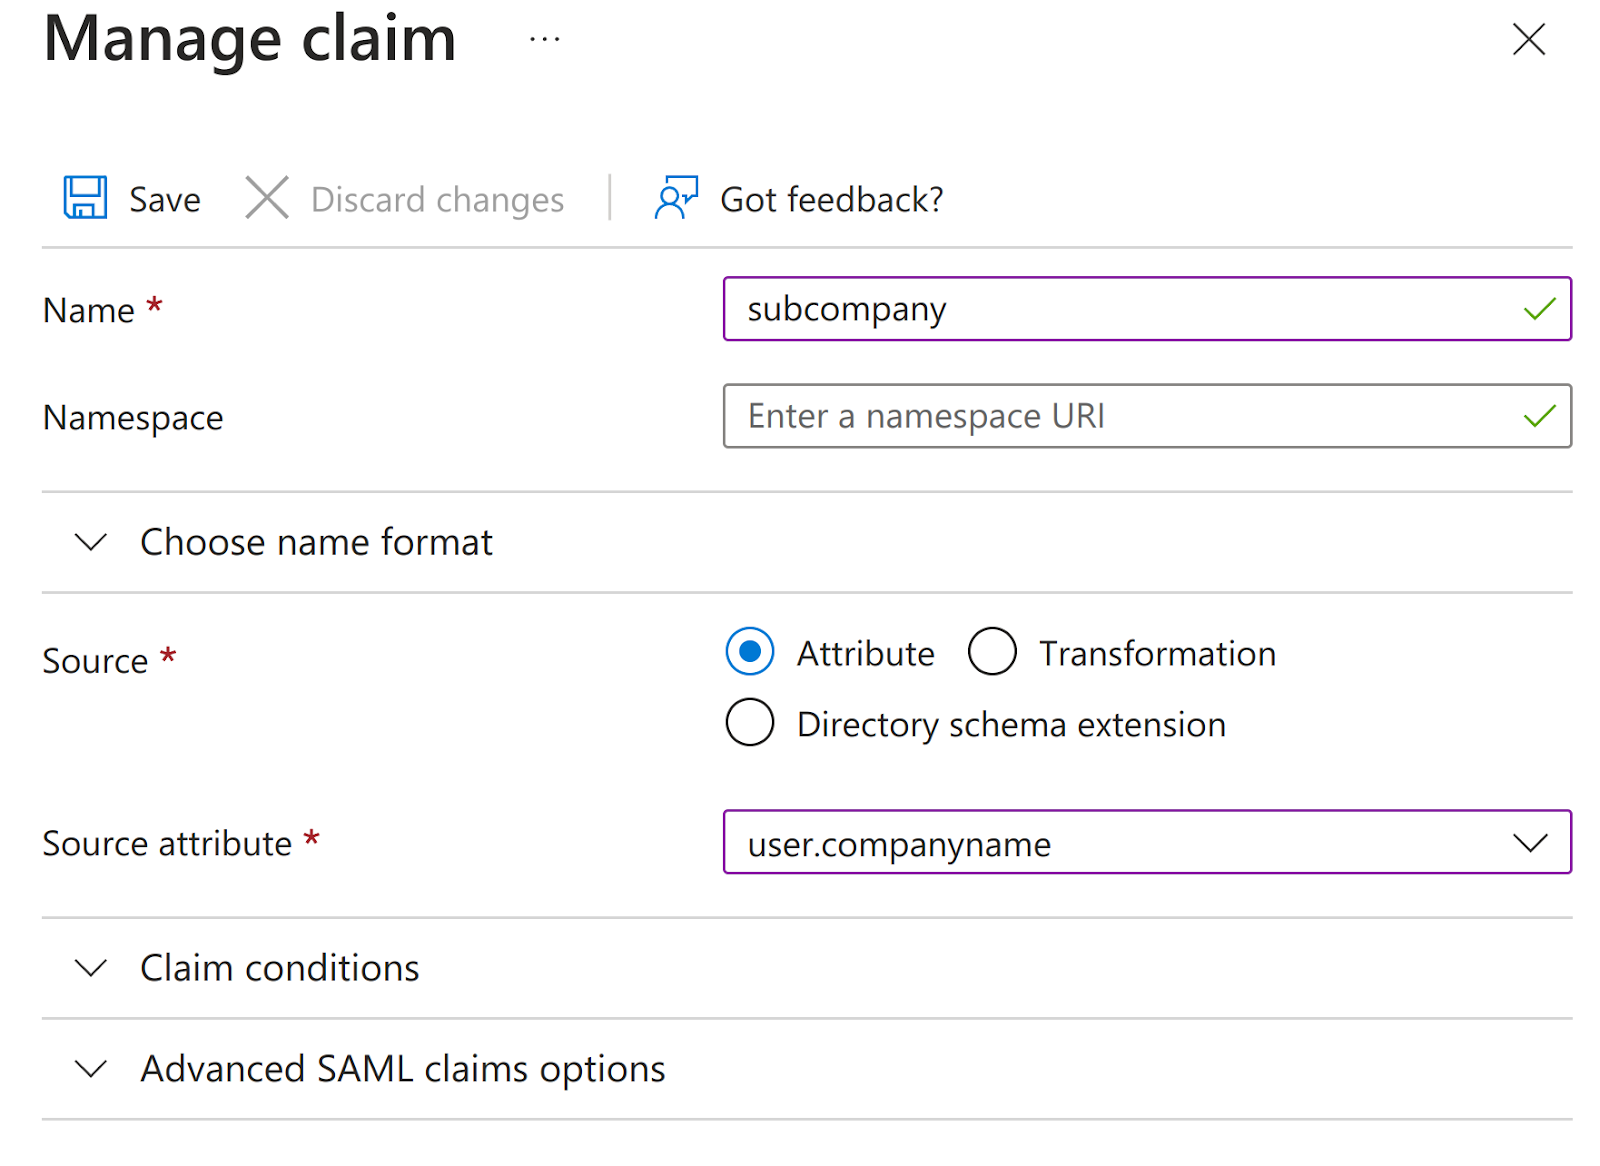
After saving your new Claim you will be redirected back to the Attributes & Claims page.
The Additional Claims mapping table should look like this:
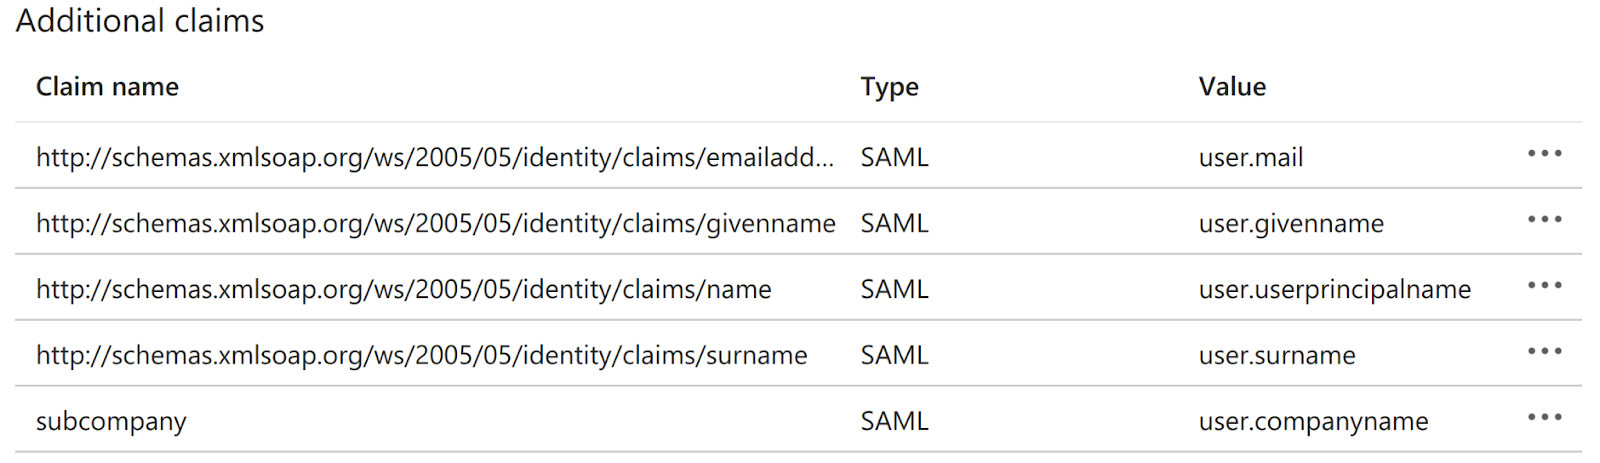
In conclusion, the new mapping line can be read like this: on a successful SAML login against this Azure IDP, the IDP will send ecosio (besides the email, first name and last name) a sub-company Claim, whose value is the one assigned on the authenticated user under the field user.companyname.
You can now move back to monitor.
In the Company Mapping section, select Custom Attribute from the Mapping Mode dropdown.
You should now see a new input field - Attribute Name.
Fill this field with the Claim you have just created in Azure - sub-company
Fill in the Attribute Value field with the exact value this custom field has in Azure:
In the end, this is how the Company Mapping Configuration that you’ve created looks like:
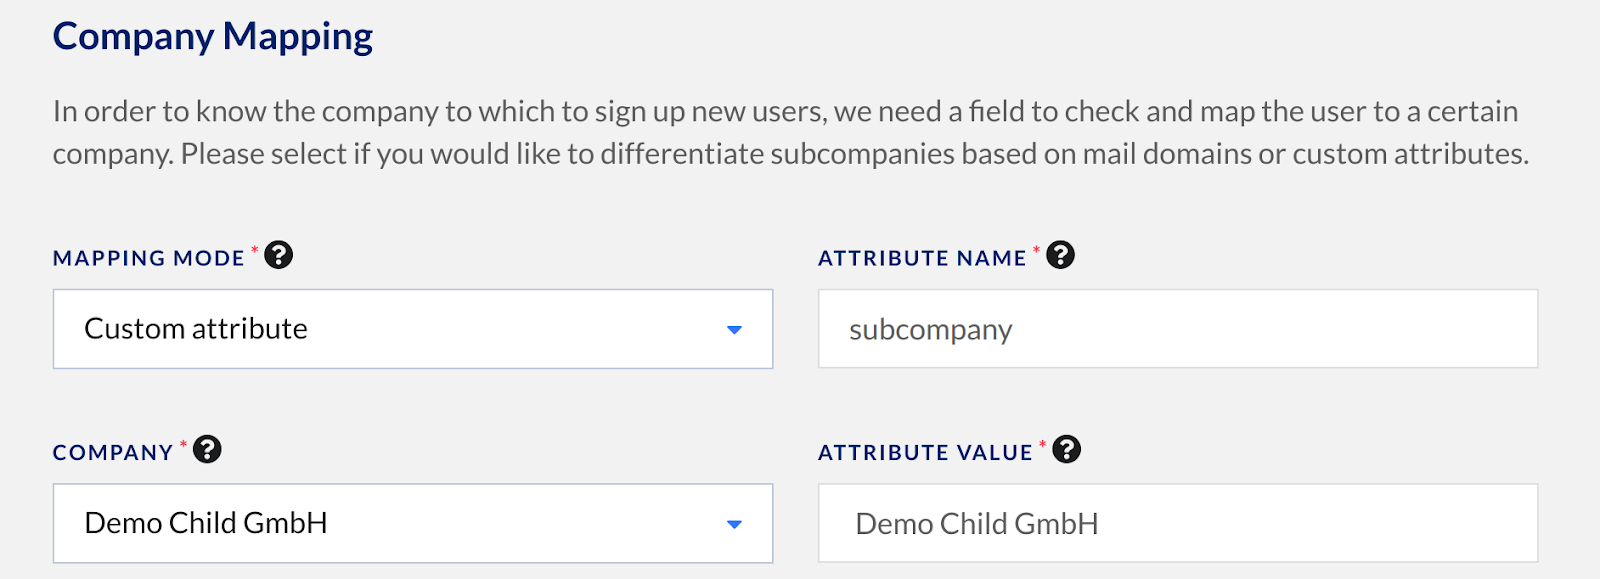
Meaning, the users, for which ecosio receives a sub-company Claim with the value of Demo Child GmbH, will be assigned to the selected company in the dropdown.
Updated 11 days ago